Saturday, October 17, 2015

2-year Update

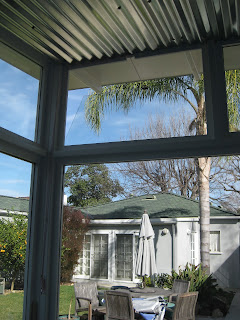
Working in the studio is just delightful. However, it did get pretty darn hot in the mornings, what with all those East-facing windows. I love the exposure, just not the heat. The deep blue floor actually absorbed the heat, too, some mornings it was too hot to walk on barefoot. Additionally, the insulation was just not quite keeping the heat from the South-facing side from getting inside, I was obliged to run the A/C more than I'd like. So I did two things:

First, I built a shade over the empty-ish "work area" that is on the South side of the studio, so the sun is quite diminished when hitting that side now, and we have a shady spot for building and fixing things, which is nice. Second, I installed titanium window film on the big windows and the door. The top windows are not covered, as they get shaded by 10am usually.

WHAT A DIFFERENCE!

Erecting the shade made a minor difference, but putting the reflective coating on the windows made it possible to put off using the A/C for hours, and sometimes I didn't have to use it at all on hot days. Should have done it much sooner!

I spent about $80 on the film (it takes a lot of film), and it was a pain in the ass to install.

So, in hindsight, I would get glass that has this feature built in. I spent $600 on the glass, I think it would be worth it to spend up to $1000 to get the cooling effect if you can. Just my 2¢.

If you've taken a gander at this site and then built your own MD100, I'd love to see yours, please email me.

Wednesday, March 12, 2014

Done!

It's been a year since I "finished" the exterior of what has become my studio. The interior is basically finished, but for some baseboard quarter rounds around the floor and a little thing here and there. Most of the plants are in and have grown a bit. This is how it looks now, as I use it:
Exterior view

My view out

The scrim curtains are from Ikea, they provide a modicum of privacy while letting in lots of light. They also make a pretty decent "screen" when I have the door open to keep out bugs, or just look nice blowing in the breeze. I've got colored lights all around the inside at the top of the door level. From outside, the studio glows like a jewel at night when they're lit.

Across the back wall, I installed bookshelves with a curtain in front. The pegboard wall has miscellaneous useful items in baskets that can be moved. The desk flips up and attaches to the wall, so I can use the full floor for a spare bed, or bring in beach chairs for wine with a couple of friends (its cozy).
Curtains closed

Curtains open
On the South wall, I've got a whiteboard, a ceramic heater (the square at the bottom), and a very shallow closet of sorts, where I store various large flat things like cutting boards, blocking squares, etc. The closet is lined with silver insulating bubble plastic, which isn't fantastic, but is better than nothing. It still gets pretty warm inside in full summer. I'll be planting a vine to grow over top of the studio to shade it this year. Closet is held shut with magnets, and there is a magnet that will hold the exterior door open, as well. 
Closet closed

Closet open


Tuesday, February 19, 2013

Shell Complete

The MD100 is complete for the purposes of this blog. I'll post photos after plants on the outside and whatnot on the inside are dealt with in a few months, but this is the finished product. If you look at the other blogs in the sidebar, you can see that these buildings can be quite idiosyncratic. Its a good design.

Looking Southwest, front window open.

Facing the front. Note the ceiling has been changed a little bit.
Oh, I also flipped the plan. I'm left-handed.
Looking Northwest, ignore the building junk in foreground.
The back, where I put windows in the top part.
They will overlook a bicycle storage area lean-to in the next couple of months.
Note the bright blue lino tile floor. Love it!
Getting ready to start getting some real work done in here....

Wednesday, February 13, 2013

On Walls

The plan is for this to be a working studio for me, and while I want the space to be nice and cozy, I'm not aiming for Fine Homebuilding (the running gag), more like "fancy TuffShed." With that in mind, I am using masonite on the walls instead of sheetrock. Its cheaper, and lighter for me to handle by myself or with my young sons. After priming, I'm using fabric as wallpaper, attached with glue and sealed with Mod Podge (whatever, I have it on hand and I know what to expect from it). I'm using reasonably nice grade thin plywood to face the top of the walls, bathroom-coated masonite as a whiteboard on one wall and painted pegboard on the other. You can see the different textures here:


When I was cutting down the 2x4s for the window frames, there was always a slim bit from the rounded sides left over. I covered that with foil and used it to hide the nail holes. Waste not want not.
The whole back wall will be covered in bookcases (backless, so I can use the outlets), I don't really care what the corners look like, I won't be able to see them.

Here is the "closet" door over the area I plan to use as slim storage for cutting boards and other flat arty things. There is an outlet in there so I can hide where the AC and heater are plugged in. It is held shut with a couple of magnets. (I'm using leftover corrugated from the back wall here.) The white square at the bottom is a ceramic radiant heater that attaches to the wall. Seems to work pretty well, but Winter in SoCal isn't very cold, so ymmv.

In Walls

After squirting a fair amount of "good stuff" expanding foam into the nooks and crannies of the corrugated steel walls, I got Hubby to install the electrical (using the old pool circuit) to my specs; 6 outlets, one switched, one with USB ports, two halogen sconces, and a ceiling fan to compliment the small A/C unit I installed and the ceramic wall heater to come. (Don't forget to put nailplates over the wiring that crosses studs—I did it after the picture.)

Once the wiring was in, insulation went up. I needed one big batt and one small roll, using every bit. I'm not using roll insulation in the space that will be behind the door, that will be a very shallow closet. I stapled up silvered bubble-wrap kind of stuff (you can see the roll at left) that I will also use on the ceiling.

Exterior Complete

Skipping a fair number of repetitive details.... I finished installing the windows. I made the high square front window open outward using stereo cabinet glass door hinges and a pulley arrangement. Its not Fine Homebuilding, but it works. I installed two small windows that open inward at the top of the back wall, using the same arrangement with a fixed bit of rope and catch magnets to hold them closed. Hubby hung a single-lite door for me (thank you, Dear). Priming, painting and weatherstripping happened mostly ahead of Winter rain, and it worked out pretty well. (Note: after getting the door up and painted, when I finally removed the protective plastic from the glass I found a big ol' sweaty handprint on the inside of the sealed glass panes. Bummer.)

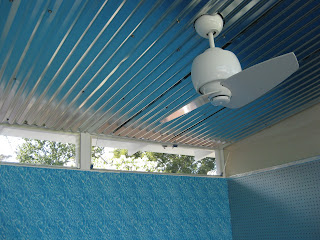
You can see the corrugated metal ceiling in these pics, too. I can't find the image I took of the "before" ceiling, but I did drill holes for airflow, and put a layer of silvered bubble wrap on top of the sheet metal, so there is an insulated air gap between the roof and the ceiling.

front window, open

back window, one open


Sunday, December 2, 2012

Moar Windows!

The plans call for plexiglass to save $, I decided it was a worthwhile investment to get glass, its not that much more expensive. I ordered 7 panels of 1/4" tempered glass for a total of $605 including delivery and taxes. This was the single largest expenditure of the project, more than wood or electrical, but I think its worth it. I went to a glass wholesaler in LA, 55Glass, with my plans and measurements. They were really helpful.

It turned out that 16 of the 8' furring strips wasn't enough, but I managed to get the largest windows framed and installed with this lot. I installed the inside and outside window frames completely, making sure the spacing was right. Once everything was drilled in and the screws had been seated once, I removed the outside half of each frame and waited for delivery.

Unfortunately, the delivery guy had to bring the "big" truck since the large pane on the front is 72"x80". I was hoping he would be driving the smaller truck, which could have pulled right up to the front of the studio. As it was, delivery is during the day and hubby is at work, so it was me and the guy lugging this giant pane to the back yard. Next time (!), I'll wear gloves, it wasn't sharp, but its heavy and bit into my hand anyway.

I had planned to use his help to install the larger pieces: As soon as he arrived, I laid a bead of clear silicone caulk around the large window frame, and when we carried it back, we just tilted it right into the frame and I let the caulk hold it for a few minutes while I reattached the top outside part of the frame. Same process for the large side pane while the delivery guy went and got the glass by himself (show off).
Look, windows!
The side pane was a little trickier, because in all the hula action of the roof the whole building managed to lean itself to the front by about half an inch, so the sides aren't square anymore. I had this pane cut slightly small to accommodate this issue. Its ugly, but the error is hidden behind the window framing, so you can't see it. Don't tell anyone.

Once the glass was in, it was somewhat difficult to tighten the screws on the frames by hand, there was no room for the drill, and the screwdriver slipped out too much in the tiny space. I ended up using a small hand ratchet with an extender once the frames were in place—(I covered the ratchet with painters tape so it didn't knock against the glass so hard.)

We're ripping some more furring strips today, but framing the rest of the windows might have to wait till it stops raining.


Still need to install these five windows, will add to this as I go: